|
7.On a suitable surface place a towel or cloth and place the playstation upside down on the cloth.(ensure that the mains cord is removed and that any disks haven't been left inside.)
8.Using the phillips screwdriver remove all the black screws from the underside of the machine.
9.turn the machine back over and remove the top casing.
10.Where the brown ribbon cable from the laser unit plugs into the main pcb,gently pull out the ribbon.this should come out with a little force.
11.Where the four wire connector from the laser unit plugs into the pcb gently pull out the
connector by pulling on all four wires at the same time.This requires a little force.
12.Simply lift off the laser unit and store in a safe place.
13.Gently pull out the controller ribbon cable out of the pcb,and unhook it from under the plastic clasp .This requires a little force.The controller ports do not need to be removed on this particular model.
14.Unplug the power cord from the main pcb by pulling firmly on the wires .This requires a little force. Also remove the power cord from the power supply pcb in the same fashion,but leave it fastened to the steel casing.
15.Remove the four gold screws from the steel cover and lift off the cover.(only the screws indicated by arrows etched on the cover need to be removed at this stage).Care should be taken as the edges of the cover can be quite sharp.
16.Remove the remaining gold screws.You should now be able to remove the pcb.
Note:- The pcb does not need to be removed from the bottom casing to continue,but i'd recommend it as it allows the pcb to be far more accessible for soldering.
17.On the top side of the pcb there is a shiny steel cover soldered to the pcb, remove this by desoldering the legs one by one while pulling on the cover to help seperate the joints.
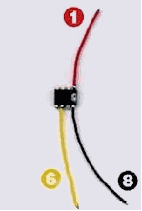
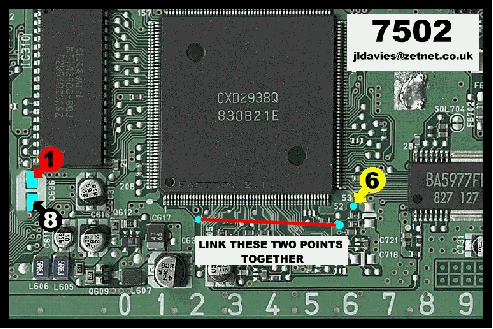
18.Locate the three points on the pcb where the chip will be directly connected to and carefully apply a small blob of solder to each point.
19.Locate the four remaining points to which the jumper wires will be attached and apply a small blob of solder to each of these points. Care must be taken as some of these points are very close to surface mounted components.
20.Stick the chip to the pcb just in front of the small white plastic switch that is used to detect the door flap (on top of the large capital "A" stamped on the pcb )
21.Carefully solder the three wires to the required points on the pcb
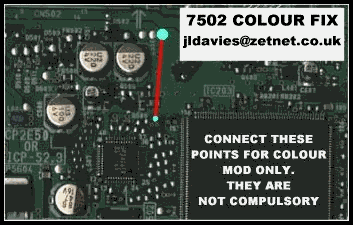
22.Solder both the one inch jumper wires across the required points.
Note :- the colour modification wire can be left out ,but I wouldn't recommend it, simply because it is so simple to fit and would be a lot of work to be put in at a later date.
23.Cut a single length of insulation tape about two inches long and place it over the modchip
24.Carefully refit the shiny cover, re-soldering the legs one at a time,ensuring that no wires are under or near the legs when heat is applied.
25.Refit everything simply by reversing the removal process.Ensure that the ferrite rings on the pcb power cable do not foul with the top cover on reassembly,and that the laser unit is sitting correctly on the three rubber bushes.
26.Power up the machine and test.
|
|


